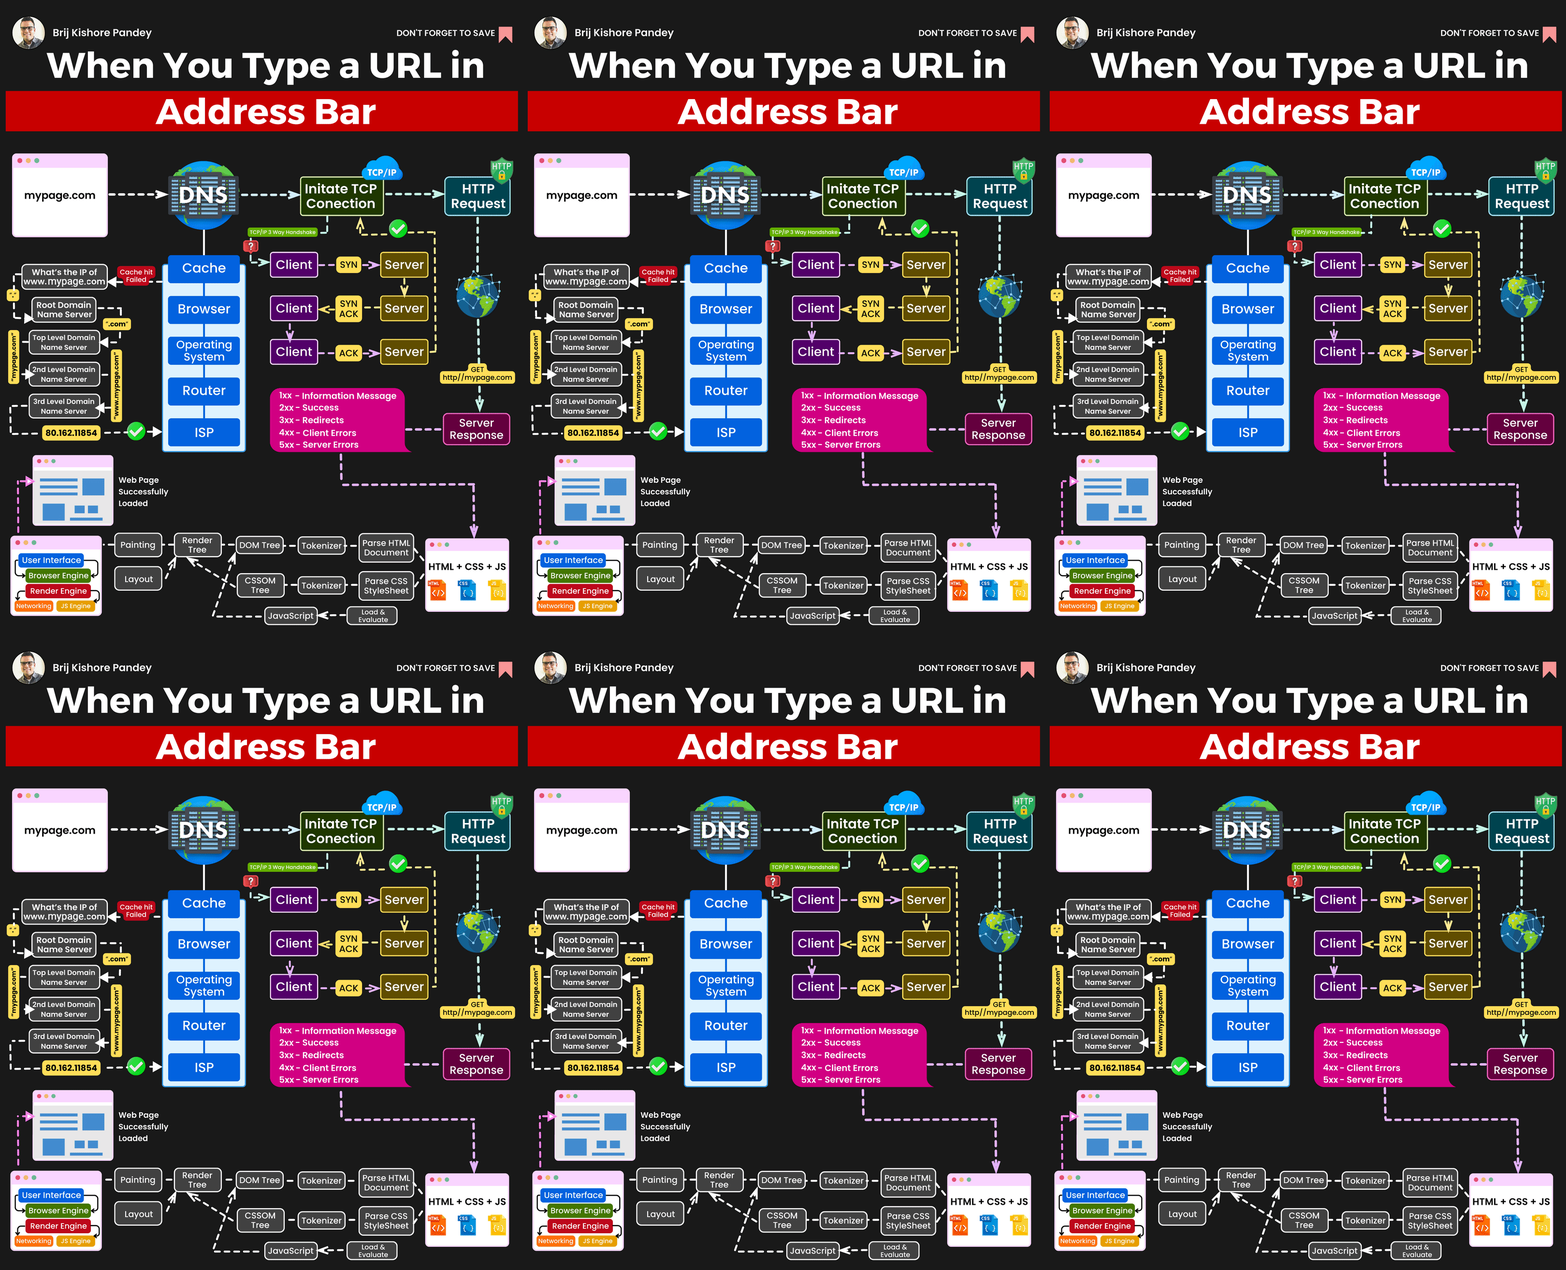
In this blog post, we’ll take you on a journey through the inner workings of web browsing, breaking down each step and providing analogies or metaphors to make it easier to understand. By the end of this article, you’ll have a clear picture of what happens when you interact with the web.
Step 1: Typing a URL
Imagine that you want to visit your favorite website, “podcreative.ca.” You type the URL into your browser’s address bar and hit Enter. This is the first step in your journey. It’s akin to entering a destination into your car’s GPS system.
Step 2: DNS Resolution
Once you press Enter, your browser needs to figure out where “podcreative.ca” is located on the internet. It can’t directly drive to the website like you can with your car. Instead, it relies on something called the Domain Name System (DNS). Think of DNS as a phone book for the internet. When you enter a URL, your browser looks up the corresponding IP (Internet Protocol) address associated with that URL in the DNS.
In our analogy, DNS is like a concierge at a hotel who checks the guest directory to find the room number of your favorite restaurant.

Step 3: Establishing a Connection
Now that your browser knows the IP address of “www.example.com,” it needs to establish a connection with the web server hosting the website. It’s as if your car has found the correct address in the GPS and is now heading to that location. This connection is typically made over a protocol called HTTP (Hypertext Transfer Protocol) or its secure counterpart, HTTPS (Hypertext Transfer Protocol Secure).
Picture this as the moment your car arrives at the restaurant. You’ve parked, and it’s time to enter the establishment.

Step 4: Requesting the Web Page

Your browser, like a polite restaurant guest, sends a request to the web server for the webpage you want to see. This request includes information such as the type of browser you’re using, the page you’re requesting, and other details. It’s like ordering your favorite dish from the restaurant menu.
In the world of browsers and web servers, this request is often referred to as an HTTP request. It’s a bit like handing your menu choices to the server.
Step 5: Processing the Request
The web server, upon receiving your request, processes it. It fetches the requested webpage, gathers all the necessary data, and prepares it for delivery. Think of the server as the kitchen staff who starts cooking your meal as soon as they receive your order.
Step 6: Sending the Response
Once the server has prepared your webpage, it sends it back to your browser as an HTTP response. This response includes the HTML, CSS, JavaScript, and any other assets required to render the webpage correctly. In our restaurant analogy, it’s like your meal being brought to your table.

Step 7: Rendering the Web Page
Now that your browser has received the response, it’s time to render the webpage. This means processing the HTML, applying the CSS styles, and executing any JavaScript code. It’s as if you’re admiring the presentation and taste of your meal.
Modern browsers have rendering engines responsible for this task, with Google Chrome using the Blink engine, Mozilla Firefox using the Gecko engine, and so on.

Step 8: Displaying the Web Page
Once the webpage is rendered, it’s displayed in your browser window for you to interact with. This is the moment when you see the restaurant’s interior, read the menu, and start enjoying your meal.
Behind the scenes, your browser manages the layout, paints the page, and handles user interactions with the help of the Document Object Model (DOM) and JavaScript’s Event Loop.
Step 9: Loading Additional Resources
Webpages often include images, videos, stylesheets, and other assets. Your browser needs to fetch these additional resources from the web server. Think of it as ordering a beverage or side dishes to complement your main course.
These resources are requested asynchronously to speed up the loading process and provide a smoother user experience.
Step 10: Completing the Page
As your browser loads and displays the webpage, it continues to process any remaining assets, ensuring that everything is in place. It’s similar to enjoying the last bites of your meal and savoring the overall dining experience.

Final
Thoughts
The journey of a URL from the address bar to a fully rendered web page is a complex but fascinating process. Each step involves numerous technologies, protocols, and systems working seamlessly to provide you with a smooth web browsing experience. Understanding this process can help you appreciate the incredible technology that powers the internet and the role your browser plays in it.
Next time you enter a URL into your browser’s address bar, remember the journey it takes: from DNS resolution to rendering the webpage. Just like a restaurant visit, web browsing involves multiple steps, and it’s the coordination of these steps that allows you to access and enjoy the vast world of information and services available on the internet.
Sources
- “How DNS Works.” ICANN, https://www.icann.org/resources/pages/dns-2012-02-25-en
- “Hypertext Transfer Protocol (HTTP/1.1): Message Syntax and Routing.” IETF, https://datatracker.ietf.org/doc/html/rfc2616
- “How Browsers Work: Behind the scenes of modern web browsers.” HTML5Rocks, https://www.html5rocks.com/en/tutorials/internals/howbrowserswork/


